Building a flashcard app in Ruby - Part 3
CLI Overhaul!
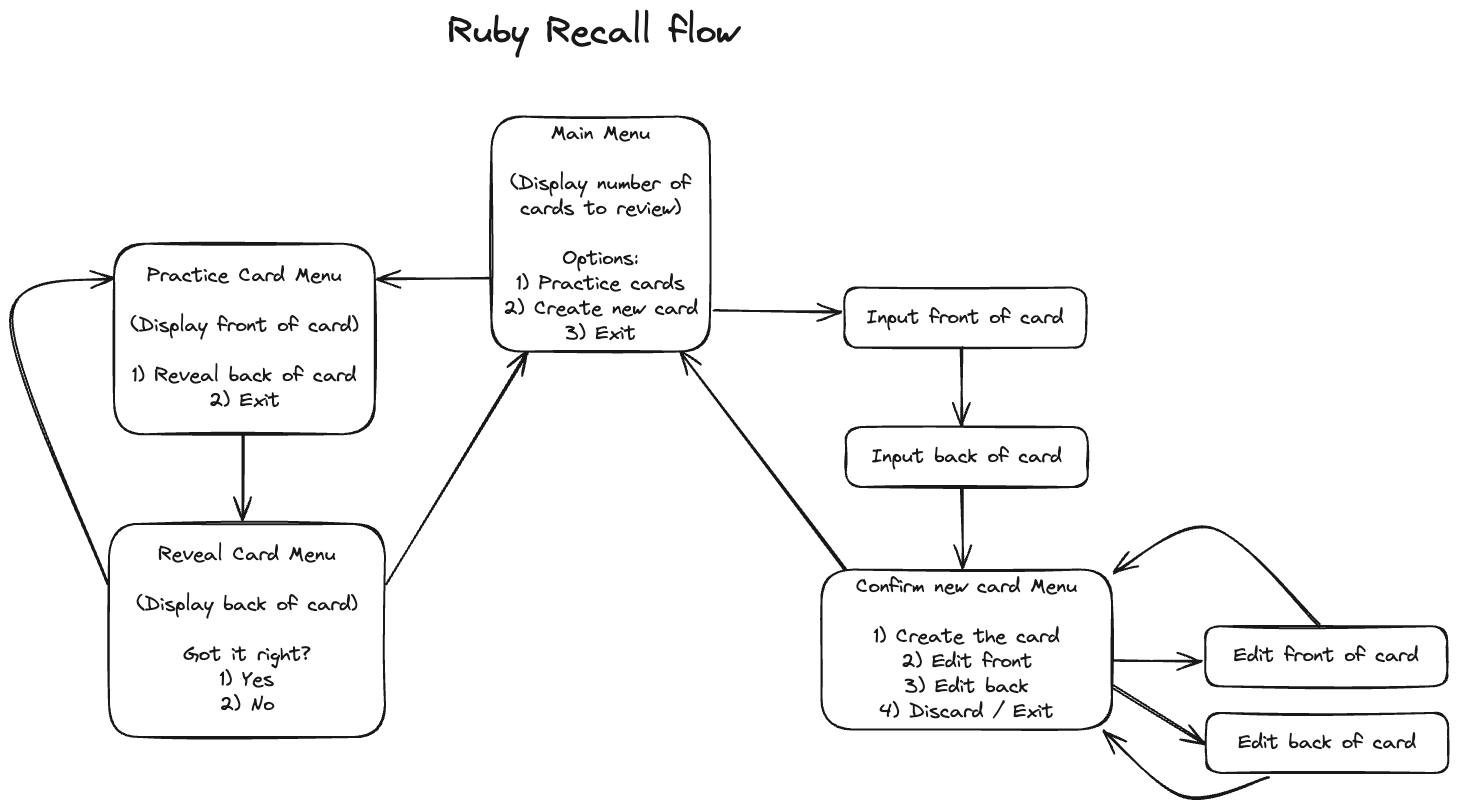
Welcome back! We’re now going to overhaul the presentation layer of the app. We’ll be implementing:
- A main menu (and submenus)
- A way to create flashcards in-app
- General improvements to user experience
In Exalidraw, I sketched up the following flow:

Now, the challenge is how to materialise this into working (and hopefully clean) code!
The menu component
Central to this design is the menu component itself, showing a list of options and allowing the user to choose one. I did some googling and found 2 libraries to help with this task:
- Highline (https://github.com/JEG2/highline)
- TTY::Prompt (https://github.com/piotrmurach/tty-prompt)
Despite looking abandoned, TTY::Prompt has a lot more features and looks more polished than Highline, so I decided to go with that.
Here’s how my main menu can be built using tty-prompt:
require "tty-prompt"

prompt = TTY::Prompt.new

prompt.select("What do you want to do?") do |menu|
  menu.enum "."
  menu.choice("practice flashcards") { do_practice }
  menu.choice("create new flashcard") { create_flashcard }
  menu.choice("exit program") { exit }
end

menu.enum configures the prompt to use numbered entries. The API is nice as it’s simple to define the menu options and to map each option to an action that will occur (function to be called), should that option be selected.
The application code
Now it’s time to decide how to structure the menu system within the application, and write the code.
Since the app will consist of many “screens”, that’s the terminology I’ll be using in the code. While not strictly necessary at this point, I’ve made each screen inherit from a base class of ApplicationScreen:
require "io/console"
require "singleton"
require "tty-prompt"

$prompt = TTY::Prompt.new(interrupt: :exit)

class ApplicationScreen
  include Singleton

  def clear_screen
    $stdout.clear_screen
  end

  def new_line
    puts ""
  end
end
- I’ve made
$prompta global variable. This is a slight code smell, but it’s a practical way to share a prompt singleton across the app while maintaining autocomplete functionality in the IDE. interrupt: :exitallows the user to cleanly exit the app by pressingCtrl+C, without the app erroring and printing a stack trace.- Each application screen will be a singleton.
- I’ve added a couple of convenience methods in
clear_screenandnew_line.
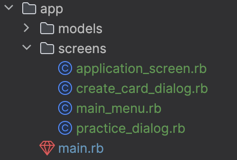
I’ve created a new directory called screens to hold the screen classes:

Here’s the app entry point screen, or “Main Menu”:
require_relative "application_screen"
require_relative "practice_dialog"
require_relative "create_card_dialog"

class MainMenu < ApplicationScreen
  def run(status = nil)
    clear_screen

    puts status || "You have #{Flashcard.all_due.count} cards to review."

    status = $prompt.select("") do |menu|
      menu.enum "."
      menu.choice("practice flashcards") { PracticeDialog.instance.run }
      menu.choice("create new flashcard") { CreateCardDialog.instance.run }
      menu.choice("exit program") { exit }
    end

    run(status)
  end
end
- Each screen has a “run” method as it’s entry point.
- All screens starts by clearing the screen, which keeps the interface clean. Otherwise, we’d still see be able to see what was printed on the previous screen.
- Initially, there’ll be a message displaying how many cards are due for review.
- The user will make a selection, and the next screen will be invoked/run.
- Eventually, the selected screen will terminate (the user finishes practicing or creating a card) and will give control back to the main menu. When it does, it will return a value (“status”) and will be printed in place of the welcome message.
Here’s the screen for creating a card:
class CreateCardDialog < ApplicationScreen
  def run
    clear_screen

    cancelled = "Cancelled."

    front = $prompt.ask("Front of card:").strip
    return cancelled if front.empty?
    back = $prompt.ask(" Back of card:").strip
    return cancelled if back.empty?

    new_line

    return cancelled unless $prompt.yes?("Save?")

    Flashcard.create!(front:, back:)
    "Card saved."
  end
end
Pretty basic, the user is prompted for the front and back texts of the card, and then asked to confirm before saving. Note that the status (“Cancelled.” or “Card saved.”) is returned to be displayed on the main menu.
Here’s the screen for practicing cards:
class PracticeDialog < ApplicationScreen
  def run
    card = Flashcard.next_due
    return "All done!" if card.nil?

    clear_screen

    puts "Front: #{card.front}"
    new_line

    return unless $prompt.yes?("Reveal back?")

    clear_screen

    puts "Front: #{card.front}"
    puts " Back: #{card.back}"
    new_line

    if $prompt.yes?("Did you guess it?")
      card.schedule_after_correct_guess
    else
      card.schedule_after_incorrect_guess
    end

    run # keep going until cards run out
  end
end
- It presents the cards one at a time, until there’s no more due, at which point it returns to the main menu with status “All done!”.
- It first shows the front of the card, waits for user input, and then shows the back.
- The user is asked if they guessed correctly, and the card will be updated/scheduled accordingly.
Finally, main.rb is modified to remove the old code and just run the main menu screen:
require_relative "../db/init"
require_relative "models/flashcard"

require_relative "screens/main_menu"

MainMenu.instance.run
Giving it a spin
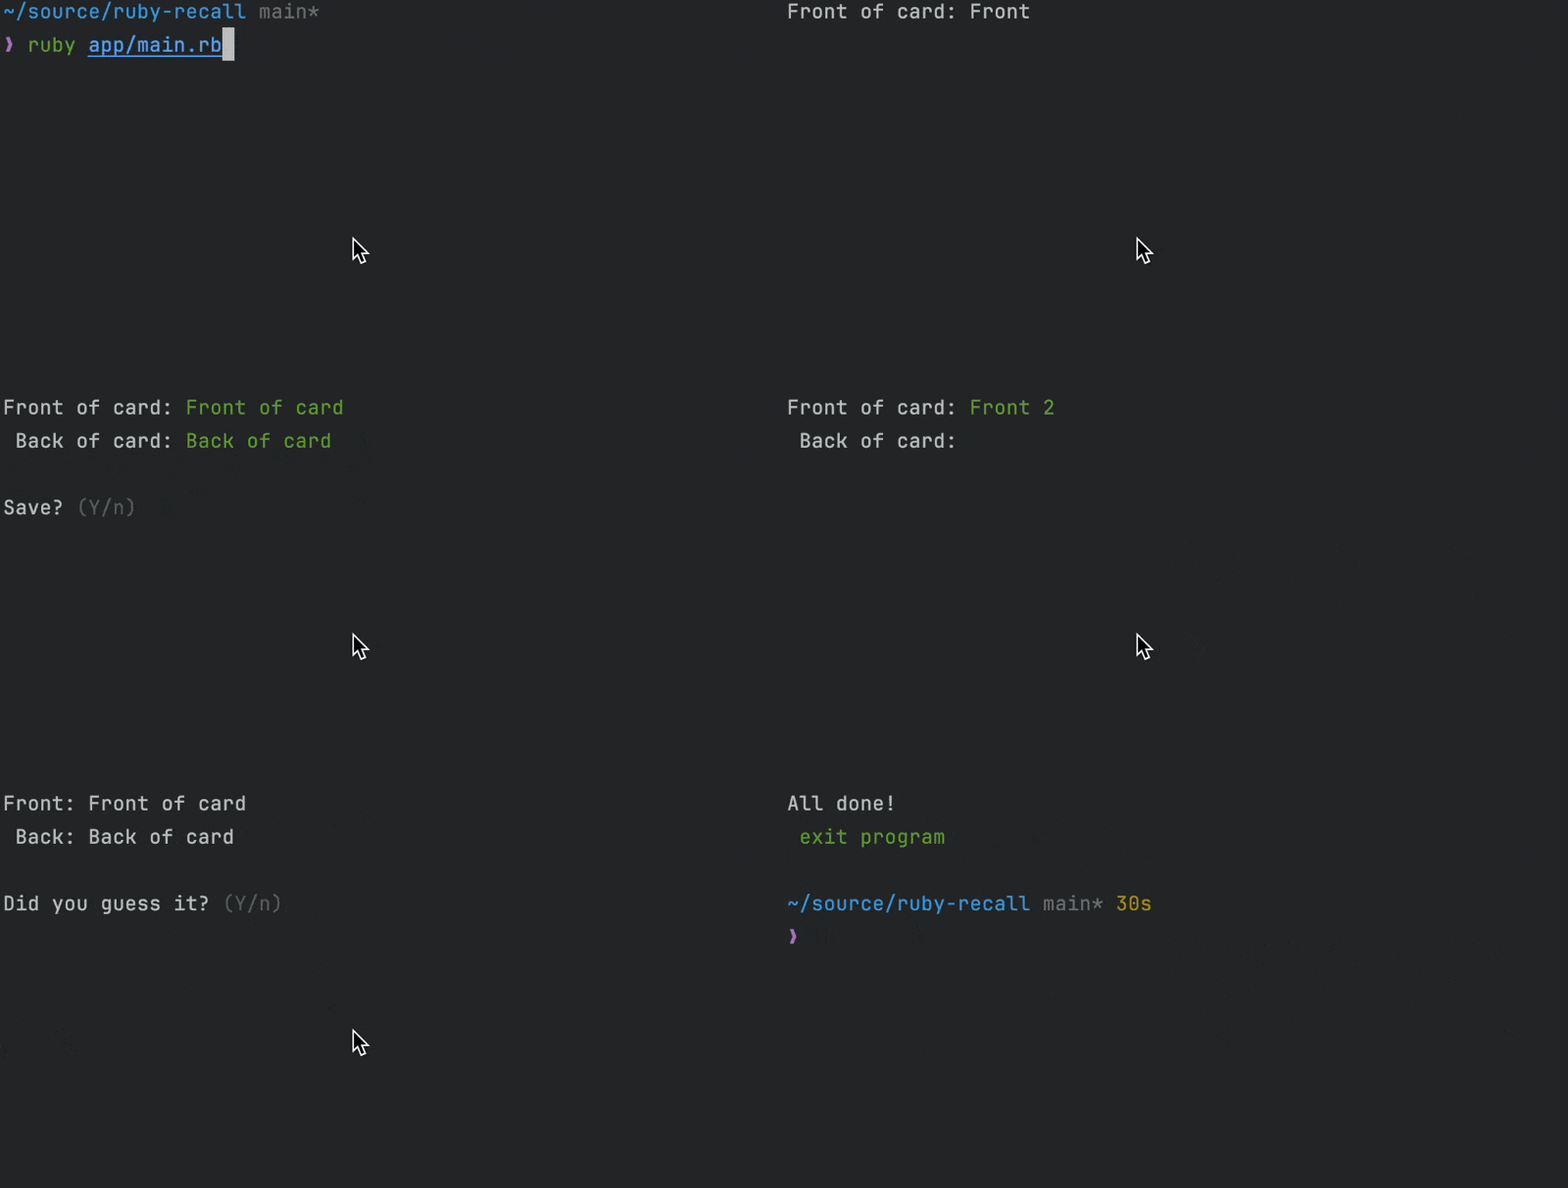
Here’s a little recording of the app in action, creating 2 cards and then practicing them:

Thoughts on card creation
Although there’s now a way to create cards in-app, I found that I still prefer to create them by script, eg:
require_relative "../db/init"
require_relative "models/flashcard"

flashcards = [
  { front: "Monday, in Finnish", back: "Maanantai" },
  { front: "Tuesday, in Finnish", back: "Tiistai" },
  { front: "Wednesday, in Finnish", back: "Keskiviikko" },
  { front: "Thursday, in Finnish", back: "Torstai" },
  { front: "Friday, in Finnish", back: "Perjantai" },
  { front: "Saturday, in Finnish", back: "Lauantai" },
  { front: "Sunday, in Finnish", back: "Sunnuntai" },
]
Flashcard.create!(flashcards)
This way I can more easily create multiple cards, using a fully featured text editor (my IDE), and I can even get AI assistance from GitHub Copilot! Hackable apps are cool.
Until next time!
See this commit in GitHub for the full code from this post.